Part 2:- API using GraphQL and Node.js

This is Article 2 for this series. You can find first article here. Our task now is to setup our graphQL API and work with it.
Table of Contents
About this Article
In this article you will learn the following things:-
About GraphQL and why to use it
Setup GraphQL
Register User to Database
Login User and get token using JWT
Write tests for the above setup
GraphQL is the better REST
Over the past decade, REST has become the standard (yet a fuzzy one) for designing web APIs. It offers some great ideas, such as stateless servers and structured access to resources. However, REST APIs have shown to be too inflexible to keep up with the rapidly changing requirements of the clients that access them.
GraphQL was developed to cope with the need for more flexibility and efficiency! It solves many of the shortcomings and inefficiencies that developers experience when interacting with REST APIs.
To illustrate the major differences between REST and GraphQL when it comes to fetching data from an API, let’s consider a simple example scenario: In a blogging application, an app needs to display the titles of the posts of a specific user. The same screen also displays the names of the last 3 followers of that user. How would that situation be solved with REST and GraphQL?
Data Fetching with REST vs GraphQL
With a REST API, you would typically gather the data by accessing multiple endpoints. In the example, these could be /users/<id> endpoint to fetch the initial user data. Secondly, there’s likely to be a /users/<id>/posts endpoint that returns all the posts for a user. The third endpoint will then be the /users/<id>/followers that returns a list of followers per user.

Image taken from other source
In GraphQL on the other hand, you’d simply send a single query to the GraphQL server that includes the concrete data requirements. The server then responds with a JSON object where these requirements are fulfilled.
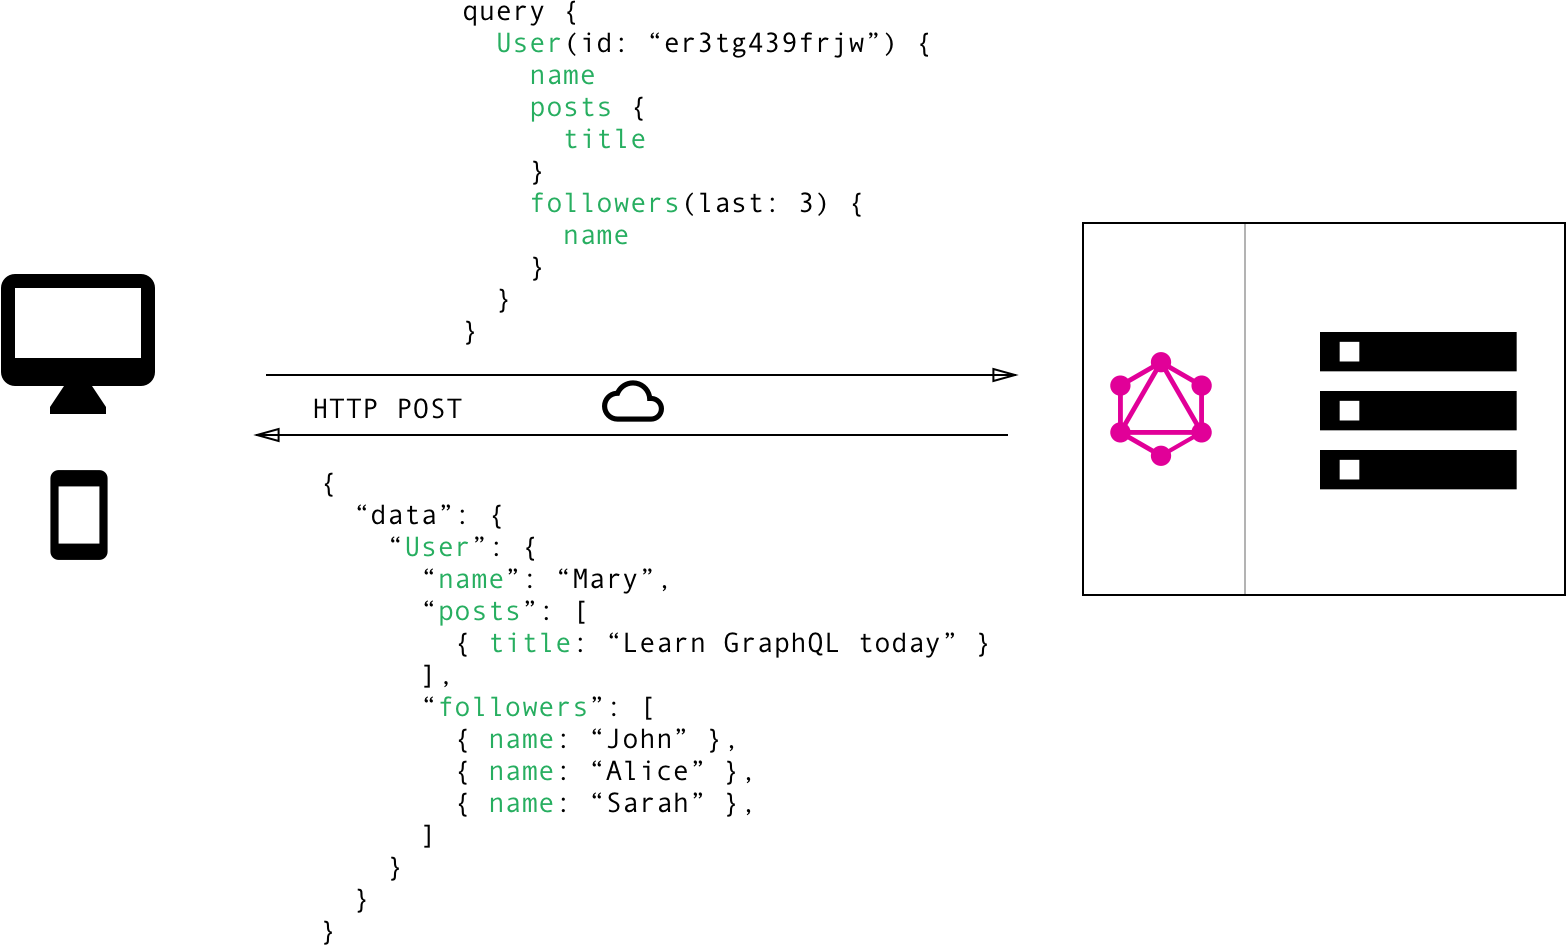
Image taken from other source
No more Over and Underfetching
One of the most common problems with REST is that of over- and underfetching. This happens because the only way for a client to download data is by hitting endpoints that return fixed data structures. It’s very difficult to design the API in a way that it’s able to provide clients with their exact data needs.
“Think in graphs, not endpoints.” Lessons From 4 Years of GraphQL by Lee Byron, GraphQL Co-Inventor.
Overfetching: Downloading superfluous data
Overfetching means that a client downloads more information than is actually required in the app. Imagine for example a screen that needs to display a list of users only with their names. In a REST API, this app would usually hit the /users endpoint and receive a JSON array with user data. This response however might contain more info about the users that are returned, e.g. their birthdays or addresses - information that is useless for the client because it only needs to display the users’ names.
Underfetching and the n+1 problem
Another issue is underfetching and the n+1 requests problem. Underfetching generally means that a specific endpoint doesn’t provide enough of the required information. The client will have to make additional requests to fetch everything it needs. This can escalate to a situation where a client needs to first download a list of elements, but then needs to make one additional request per element to fetch the required data.
As an example, consider the same app would also need to display the last three followers per user. The API provides the additional endpoint /users/<user-id>/followers. In order to be able to display the required information, the app will have to make one request to the /users endpoint and then hit the /users/<user-id>/followers endpoint for each user.
Benefits of a Schema & Type System
GraphQL uses a strong type system to define the capabilities of an API. All the types that are exposed in an API are written down in a schema using the GraphQL Schema Definition Language (SDL). This schema serves as the contract between the client and the server to define how a client can access the data.
Once the schema is defined, the teams working on frontend and backends can do their work without further communication since they both are aware of the definite structure of the data that’s sent over the network.
Frontend teams can easily test their applications by mocking the required data structures. Once the server is ready, the switch can be flipped for the client apps to load the data from the actual API.
Setting up GraphQL
I hope I taught you little bit about graphQL, to know more you can check out here. GraphQL is a query language for your API, and a server-side runtime for executing queries by using a type system you define for your data. GraphQL isn’t tied to any specific database or storage engine and is instead backed by your existing code and data. A GraphQL service is created by defining types and fields on those types, then providing functions for each field on each type. We will be using express-graphql for our application. So run this command in your terminal
npm i --quiet graphql express-graphql --save
Non npm users just copy this to package.json
"express-graphql": "^0.7.1",
"graphql": "^14.0.2",
We will require our installed module and use this, so now copy this to your src/app.ts
const graphqlHTTP = require("express-graphql");
import { schema } from "./schemas";
Also change our member function private this.initAppRoutes() {} in src/app.ts to the code given below.
private initAppRoutes() {
  this.app.use("/graphql", graphqlHTTP({
    schema,
    graphiql: true,
  }));
}
You will encounter some error, so lets work and solve them. Firstly, we need to create a schemas folder inside src. Then create a 5 files inside it
userSchema.ts
graphql.ts
userLoginSchema.ts
userRegisterSchema.ts
index.ts
Inside src/schemas/userSchema.ts copy this
import bcrypt = require("bcrypt-nodejs");
import { Schema } from "mongoose";
import mongoose = require("mongoose");

mongoose.Promise = global.Promise;

/**
 * This is Schema for User
 * @constant {UserSchema}
 */
export const UserSchema = new Schema({
  id: {
    type: String,
  },
  username: {
    type: String,
    trim: true,
    unique: true,
    select: true,
  },
  name: {
    type: String,
    select: true,
    required: true,
  },
  password: {
    type: String,
    select: false,
  },
}, {
  timestamps: {},
});

UserSchema.methods.generateHash = function(password): boolean {
  return bcrypt.hashSync(password, bcrypt.genSaltSync(8), null);
};

UserSchema.methods.validPassword = function(password): boolean {
  return bcrypt.compareSync(password, this.password);
};
Explanation:-
This file defines mongoose schema for our database.
Line 1–3:- Requiring necessary module.
Line 11–32:- We are exporting our schema on line 11. On the same line we create a new Schema with properties specified below. Lets expain username property. username will be of type String and it will be unique. What select property does that is when we call this schema it will show the property of user which have select as true. You may notice we have specified select: false for password on line 28. It means we won’t be getting password by default for any queries we execute for user.
Line 34–40:- We defined 2 methods for users to generate a hashed password and validate that password.
Inside src/schemas/graphql.ts copy this
import { GraphQLNonNull, GraphQLObjectType, GraphQLSchema } from "graphql";
import { login, register } from "../routes";
import { userLoginSchema } from "./userLoginSchema";
import { userRegisterSchema } from "./userRegisterSchema";

// Define the Query type
const queryType = new GraphQLObjectType({
  name: "Query",
  fields: {
    loginUser: {
      type: new GraphQLNonNull(userRegisterSchema.responseType),
      // `args` describes the arguments that the `user` query accepts
      args: {
        input: { type: userLoginSchema.UserInput },
      },
      async resolve(_, args) {
        const val = await login(args);
        return val;
      },
    },
  },
});

// Defining Mutation
const mutationType = new GraphQLObjectType({
  name: "Mutation",
  fields: {
    registerUser: {
      type: new GraphQLNonNull(userRegisterSchema.responseType),
      // `args` describes the arguments that the `user` query accepts
      args: {
        input: { type: userRegisterSchema.UserInput },
      },
      async resolve(_, args) {
        const val = await register(args);
        return val;
      },
    },
  },
});

export const schema = new GraphQLSchema({
  query: queryType,
  mutation: mutationType,
});
Explanation:-
In this file we are defining our schema for graphQL here.
Line 7–22:- We define querytype as type query. In this we will be defining all our queries. fileds property tell all queries we can use. Line 10–15 will be like this for example.
query loginUser($input userInputLogin) {
loginUser(input: $input){}
where $input is
{
input {
username: "anything",
password: "anything,
}
. After this when query is written and input is provided line 16 will execute and it will asynchronously execute resolve function which is provided 2 arguments. args contains the input that we provided. After we wait for our login result as login returns a promise. We return the value on line 18. Similarly line 25–40 work but it is of type mutation, it is somewhat like POST request.
Inside src/schemas/userLoginSchema.ts copy this
import { GraphQLInputObjectType, GraphQLString } from "graphql";

// User input is getting input from user
const UserInput = new GraphQLInputObjectType({
  name: "UserInputLogin",
  fields: {
    username: { type: GraphQLString },
    password: { type: GraphQLString },
  },
});

export const userLoginSchema = {
  UserInput,
};
Explanation:-
- In this file we define the login Schema. It will be the return type of our input that we are providing.
Inside src/schemas/userRegisterSchema.ts copy this
import { GraphQLBoolean, GraphQLID, GraphQLInputObjectType, GraphQLInt, GraphQLNonNull, GraphQLObjectType, GraphQLString } from "graphql";

// User type
const userType = new GraphQLObjectType({
  name: "User",
  fields: {
    id: { type: GraphQLID },
    username: { type: GraphQLString },
    name: { type: GraphQLString },
    password: { type: GraphQLString },
    token: { type: GraphQLString },
    createdAt: { type: GraphQLString },
    updatedAt: { type: GraphQLString },
  },
});

// Data reponse of user
const DataResponse = new GraphQLObjectType({
  name: "DataResponse",
  fields: {
    success: { type: GraphQLBoolean },
    user: { type: userType },
    token: { type: GraphQLString },
  },
});

// Response from User
const responseType = new GraphQLObjectType({
  name: "Response",
  fields: {
    code: { type: new GraphQLNonNull(GraphQLInt) },
    message: { type: new GraphQLNonNull(GraphQLString) },
    data: { type: new GraphQLNonNull(DataResponse) },
  },
});

// User input is getting input from user
const UserInput = new GraphQLInputObjectType({
  name: "UserInputRegister",
  fields: {
    username: { type: GraphQLString },
    name: { type: GraphQLString },
    password: { type: GraphQLString },
  },
});

export const userRegisterSchema = {
  userType,
  DataResponse,
  responseType,
  UserInput,
};
Explanation:-
- In this file we define the register Schema. It will be the return type of our input that we are providing.
And finally copy this to src/schemas/index.ts
export * from "./userSchema";
export * from "./graphql";
export * from "./userRegisterSchema";
export * from "./userLoginSchema";
You will be getting error Cannot find module '../routes'. Don’t worry we will fix it later. Let’s first create some important things. Create a folder models and 2 files inside it
response.ts
index.ts
Copy this inside src/models/response.ts
export class Response {
  public code: number;
  public message: string;
  public data: any;
  constructor(code: number, message: string, data: any) {
    this.code = code;
    this.message = message;
    this.data = data;
  }
}
Copy this inside src/models/index.ts :
export * from "./response";
To modulerize our code we will create another folder functions and a file inside it
- complete.ts
Copy this inside src/functions/complete.ts :
import { Response } from "../models";

export function completeRequest(promise: Promise<Response>): any {
  const res = promise.then((response) => {
    const finallResponse = {
      code: response.code,
      message: response.message,
      data: response.data,
    };
    return finallResponse;
  }).catch((errorRes) => {
    const finallResponse = {
      code: errorRes.code,
      message: errorRes.message,
      data: errorRes.data,
    };
    return finallResponse;
  });
  return res;
}
This file returns a promise that contains final response of data. We resolve this promise in our graphql.ts file.
Before solving our routes folder issue we will first create a folder called interface and then create 2 files inside it, given below:-
userInterface.ts
index.ts
One of TypeScript’s core principles is that type-checking focuses on the shape that values have. This is sometimes called “duck typing” or “structural subtyping”. In TypeScript, interfaces fill the role of naming these types, and are a powerful way of defining contracts within your code as well as contracts with code outside of your project.
copy this inside src/interfaces/userInteface.ts :
import {Document} from "mongoose";

/**
 * This is interface for user
 * @interface
 * @extends {Document}
 */
export interface IUser extends Document {
  // tslint:disable-next-line:semicolon
  username: string,
  // tslint:disable-next-line:semicolon
  password: string,
  // tslint:disable-next-line:semicolon
  _id: any,
  // tslint:disable-next-line:semicolon
  name: string,
}
And copy this inside src/interfaces/index.ts
export * from "./userInterface";
Now everthing is complete. Its time to create routes folder. Create 2 files inside it
user.ts
index.ts
And copy this inside src/routes/user.ts
import jwt = require("jsonwebtoken");
import { model } from "mongoose";
import { completeRequest } from "../functions/complete";
import { IUser } from "../interfaces";
import { Response } from "../models";
import { UserSchema } from "../schemas";
import { Config } from "../shared";

const User = model("User", UserSchema);

  /**
   * This is route for registering user in database
   * @param args
   */

export async function register(args) {
  const promise: Promise<Response> = new Promise<Response>((resolve, reject) => {

    const secret: any = Config.secretKeys.jwtSecret;
      // getting data from args
    const username = String(args.input.username).trim();
    if (!username || !args.input.username || !args.input.name) {
      reject(new Response(200, "Please fill both username and name", {
        success: false,
      }));
    } else if (username.length < 4 || args.input.name.trim().length < 4) {
      reject(new Response(200, "Username and name should be contain atleast 4 characters", {
        success: false,
      }));
    } else {
      const name = args.input.name.trim();
      User.findOne({ username }).then((user: any) => {
        if (user !== null) {
          reject(new Response(200, "username already in use", {
            success: false,
          }));
        } else {
          const newUser: any = new User({
            username,
            name,
          });

          newUser.id = newUser._id;
          // generating new hashed password
          newUser.password = newUser.generateHash(args.input.password);
          newUser.save().then((user: IUser) => {

            const token = jwt.sign({ id: user._id }, secret, {
              expiresIn: "23h",
            });

            resolve(new Response(200, "Successful response", {
              success: true,
              user,
              token,
            }));
          });
        }
      });
    }
  });
  const val = await completeRequest(promise);
  return val;
}

export async function login(args) {
  const promise: Promise<Response> = new Promise<Response>((resolve, reject) => {

    if (!args.input.username || !args.input.password) {
      reject(new Response(200, "Please enter both field username and password", {
        success: false,
      }));
    }
    // Getting data from req.body
    const username = args.input.username;
    const secret: any = Config.secretKeys.jwtSecret;
    // Searching for User in database
    User.findOne({ username }).select("password id createdAt updatedAt").then((user: any) => {
      if (!user) {
        reject(new Response(200, "Sorry, No user found", {
          success: false,
        }));
      } else {
        if (!user.validPassword(args.input.password)) {
          reject(new Response(200, "Incorrect Password", {
            success: false,
          }));
        } else {
          const token = jwt.sign({ id: user._id }, secret, {
            expiresIn: "23h",
          });
          resolve(new Response(200, "Successful response", {
            success: true,
            user,
            token,
          }));
        }
      }
    });
  });
  const val = await completeRequest(promise);
  return val;
}
Explanation:-
Line 1–7:- We require necessary modules.
Line 9:- We create a model for our userSchema.
Line 16:- We export our function to register user to database. This function is returning a promise. The parameter args contains input from user.
Line 22–29:- We write tests for wrong input from user and reject our promise with our Response class that we created in response.ts.
Line 32–37:- If everything from user side looks fine, we check whether the username entered by user is already in database or not. If yes we reject with another new response.
Line 38–41:- We create a new User.
Lin 45:- We hash the password using the method we created in userSchema.ts.
Line 52–57:- If everything is fine, we resolve our promise and send the required info.
Line 62–63:- Our function completeRequest defined in functions folder, takes a promise and resolves it and send back another promise with some our required data. Then we use use await to wait for our data, until it is returned to us and stored inside val. Then we return val.
Similary like this we are working with login function starting from line 66.
Before running our code, lets create our tests for the code we have written so far. Create 2 files inside src/test
registerUserQueries.ts
loginUserQueries.ts
Copy this inside src/test/registerUserQueries.ts
const query = `mutation registerUser($input: UserInputRegister) {
  registerUser(input: $input) {
    code
    message
    data {
      token
      success
      user {
        id
        createdAt
        username
        name
        password
        updatedAt
      }
    }
  }
}
`;

const registerSuccessfullyQuery = {
  query: query,
  operationName: "registerUser"
  ,
  variables: {
    input: {
      username: "knrt10",
      name: "Kautilya",
      password: "test",
    },
  },
};

const registerSuccessfullyQuerySecondUser = {
  query: query,
  operationName: "registerUser"
  ,
  variables: {
    input: {
      username: "knrt191",
      name: "Second",
      password: "test",
    },
  },
};

const registerSuccessfullyQueryThirdUser = {
  query: query,
  operationName: "registerUser"
  ,
  variables: {
    input: {
      username: "knrt1912",
      name: "Third",
      password: "test",
    },
  },
};

const registerFailNoUsernameQuery = {
  query: query ,
  operationName: "registerUser"
  ,
  variables: {
    input: {
      username: "",
      name: "Kautilya",
      password: "test",
    },
  },
};

const registerFailSmallUsernameQuery = {
  query: query,
  operationName: "registerUser"
  ,
  variables: {
    input: {
      username: "d   ",
      name: "Kautilya",
      password: "test",
    },
  },
};

export const registerqueries = {
  registerSuccessfullyQuery,
  registerSuccessfullyQuerySecondUser,
  registerSuccessfullyQueryThirdUser,
  registerFailNoUsernameQuery,
  registerFailSmallUsernameQuery,
};
Explanation:- In this file we are creating a demo possible queries for register API which user can pass. We use this in our tests.
Line 1–19:- It contains our query that we will use later to register user, but in our tests we need our code to automatically create user, so we use this method.
Line 21–32:- We are defining a constant that is just an example of data we will be sending to our test route. It is using query that we defined on line 1. The operation name will be registerUser. Also we are passing variables to our query declared on line 25.
Rest file contains same type of different cases that a user can enter. We will test those all cases in our tests.
In the end we are exporting all the constants that we declared in this file, so that they can be used in other files.
And copy this inside src/test/loginUserQueries.ts
const query = `query loginUser($input: UserInputLogin) {
  loginUser(input: $input) {
    code,
    message,
    data {
      success
      user {
        id
        name
        username
        password
      }
      token
    }
  }
}`;

const loginSuccessfullyQuery = {
  query: query,
  operationName: "loginUser"
  ,
  variables: {
    input: {
      username: "knrt10",
      password: "test",
    },
  },
};

const loginFailWrongPasswordQuery = {
  query: query,
  operationName: "loginUser"
  ,
  variables: {
    input: {
      username: "knrt10",
      password: "test1",
    },
  },
};

const loginFailNopassWordorUsernameQuery = {
  query: query,
  operationName: "loginUser"
  ,
  variables: {
    input: {
      username: "",
      password: "",
    },
  },
};

const loginFailwrongUsernamQuery = {
  query: query,
  operationName: "loginUser"
  ,
  variables: {
    input: {
      username: " bla ",
      password: "shit this is bro",
    },
  },
};

export const loginQueries = {
  loginSuccessfullyQuery,
  loginFailWrongPasswordQuery,
  loginFailNopassWordorUsernameQuery,
  loginFailwrongUsernamQuery,
};
Explanation:- In this file we are creating a demo possible queries for login API which user can pass. We use this in our tests.
Just like registerQueries, this file has a query declared on line 1, which we will use in our test.
Cases that user can enter are declared in rest of file and then finally exported to be used later on in our test file.
Now you need to make changes to your src/test/user-test.spec.ts Update your whole file to this.
import chai = require("chai");
import chaiAsPromised = require("chai-as-promised");
import chaiHttp = require("chai-http");
import { suite, test } from "mocha-typescript";
import { model } from "mongoose";
import sinon = require("sinon");
import { Response } from "../models";
import { UserSchema } from "../schemas";
import { TodoApp } from "../server";
import { Config } from "../shared";
import { loginQueries } from "./loginUserQueries";
import { registerqueries } from "./registerUserQueries";

const User = model("User", UserSchema);
// starting the server
const server: TodoApp = new TodoApp(process.env.API_PORT || 3001);
server.startServer();

chai.use(chaiAsPromised);
chai.use(chaiHttp);

@suite("User Test class")
class UserTests {
  static user: any;

  static before() {
    this.testData = {
      input: {
        username: "knrt10",
        name: "Kautilya",
        password: "test",
      },
    };
  }

  static after() {
    // Delete User Created So that it does not provide error in next test
    User.findOneAndDelete({ username: UserTests.testData.input.username }, () => {
      process.exit(0);
    });
  }

  private static testData: any;
  private static token: string;

  @test("Testing Local Connection - try connection for Local mongodb")
  public localDb(done) {
    setTimeout(() => {
      Config.dbSettings.localDatabase = true;
      const mock = sinon.mock(new TodoApp(process.env.API_PORT || 3001), "constructor");
      chai.expect(mock.object.infoString).to.deep.equal("mongodb://" + Config.dbSettings.connectionString + "/" + Config.dbSettings.database);
      done();
    }, 100);
  }

  @test("Testing Docker Connection - try connection for docker mongodb")
  public dockerDb(done) {
    Config.dbSettings.localDatabase = false;
    const mock = sinon.mock(new TodoApp(process.env.API_PORT || 3001), "constructor");
    chai.expect(mock.object.infoString).to.deep.equal("mongodb://" + Config.dbSettings.dockerconnectionString + "/" + Config.dbSettings.database);
    done();
  }

  @test("Testing Online Connection - try connection for online mongodb")
  public OnlineDb(done) {
    Config.dbSettings.authEnabled = true;
    const mock = sinon.mock(new TodoApp(process.env.API_PORT || 3001), "constructor");
    chai.expect(mock.object.infoString).to.deep.equal("mongodb://" + Config.dbSettings.username + ":" + Config.dbSettings.password + "@"
      + Config.dbSettings.connectionString + "/" + Config.dbSettings.database);
    done();
  }

  @test("POST Register - try Register User Successfuly")
  public createUser(done) {
    chai.request("http://localhost:" + server.port)
      .post("/graphql")
      .send(registerqueries.registerSuccessfullyQuery)
      .end((err, res) => {
        chai.expect(res).to.have.status(200);
        chai.expect(res.body.data.registerUser).to.deep.equal(new Response(200, "Successful response", {
          success: true,
          user: res.body.data.registerUser.data.user,
          token: res.body.data.registerUser.data.token,
        }));
        done();
      });
  }

  @test("POST Register - Don't register as user already registered")
  public dontRegisterUser(done) {
    chai.request("http://localhost:" + server.port)
      .post("/graphql")
      .send(registerqueries.registerSuccessfullyQuery)
      .end((err, res) => {
        chai.expect(res).to.have.status(200);
        chai.expect(res.body.data.registerUser).to.deep.equal(new Response(200, "username already in use", {
          success: false,
          token: null,
          user: null,
        }));
        done();
      });
  }

  @test("POST Register - try No username field")
  public dontCreateUser(done) {
    chai.request("http://localhost:" + server.port)
      .post("/graphql")
      .send(registerqueries.registerFailNoUsernameQuery)
      .end((err, res) => {
        chai.expect(res).to.have.status(200);
        chai.expect(res.body.data.registerUser).to.deep.equal(new Response(200, "Please fill both username and name", {
          success: false,
          token: null,
          user: null,
        }));
        done();
      });
  }

  @test("POST Register - try username of small length")
  public dontCreateUserLessLength(done) {
    chai.request("http://localhost:" + server.port)
      .post("/graphql")
      .send(registerqueries.registerFailSmallUsernameQuery)
      .end((err, res) => {
        chai.expect(res).to.have.status(200);
        chai.expect(res.body.data.registerUser).to.deep.equal(new Response(200, "Username and name should be contain atleast 4 characters", {
          success: false,
          token: null,
          user: null,
        }));
        done();
      });
  }

  @test("POST Login - try Successful Login")
  public login(done) {
    chai.request("http://localhost:" + server.port)
      .post("/graphql")
      .send(loginQueries.loginSuccessfullyQuery)
      .end((err, res) => {
        UserTests.user = res.body.data.loginUser.data.user;
        UserTests.token = res.body.data.loginUser.data.token;
        chai.expect(res).to.have.status(200);
        chai.expect(res.body.data.loginUser).to.deep.equal(new Response(200, "Successful response", {
          success: true,
          user: res.body.data.loginUser.data.user,
          token: res.body.data.loginUser.data.token,
        }));
        done();
      });
  }

  @test("POST Login - try hit the login with incorrect credentials route")
  public loginWithIncorrect(done) {
    chai.request("http://localhost:" + server.port)
      .post("/graphql")
      .send(loginQueries.loginFailWrongPasswordQuery)
      .end((err, res) => {
        chai.expect(res).to.have.status(200);
        chai.expect(res.body.data.loginUser).to.deep.equal(new Response(200, "Incorrect Password", {
          success: false,
          user: null,
          token: null,
        }));
        done();
      });
  }

  @test("POST Login - try hit the login no password")
  public wrongInputFields(done) {
    chai.request("http://localhost:" + server.port)
      .post("/graphql")
      .send(loginQueries.loginFailNopassWordorUsernameQuery)
      .end((err, res) => {
        chai.expect(res).to.have.status(200);
        chai.expect(res.body.data.loginUser).to.deep.equal(new Response(200, "Please enter both field username and password", {
          success: false,
          user: null,
          token: null,
        }));
        done();
      });
  }

  @test("POST Login - try Posting wrong username")
  public NoUser(done) {
    chai.request("http://localhost:" + server.port)
      .post("/graphql")
      .send(loginQueries.loginFailwrongUsernamQuery)
      .end((err, res) => {
        chai.expect(res).to.have.status(200);
        chai.expect(res.body.data.loginUser).to.deep.equal(new Response(200, "Sorry, No user found", {
          success: false,
          user: null,
          token: null,
        }));
        done();
      });
  }
}
Explanation:-
Line 1–12:- We require all the necessary files and modules.
Line 14:- We create a user model for our tests.
Line 16–17:- We start the server of our express application.
Line 26–34:- before is a method on chai that executes before our tests start running. So anything declared inside it will execute first.
Line 36–41:- Similarly like before method, after method is a predefined method in chai. It will be executed after all the tests have run. It does not depend your tests pass or fail. In Our tests are running inside a class, so we need to declare these methods as static which means that it doesn’t have to be instantiated. In this method we are deleting user that we will create in our tests, so that next that we run our test that user is not already present in our database.
Line 73–87:- This tests is checking whether user gets successfully registered to database. We create a post request with data we created in our registerUserQueries.ts. And then this code send data to our code written in user.ts and if returns a response. Then we check assertion wheter the response matches with the required response in our test.
Just like this we create different test cases for all possible situation. Just read the message inside @test(""), you will understand what test case it is about.
Remember before running tests your mongoDb server is up and running then when you run npm run build && npm run coverage you get
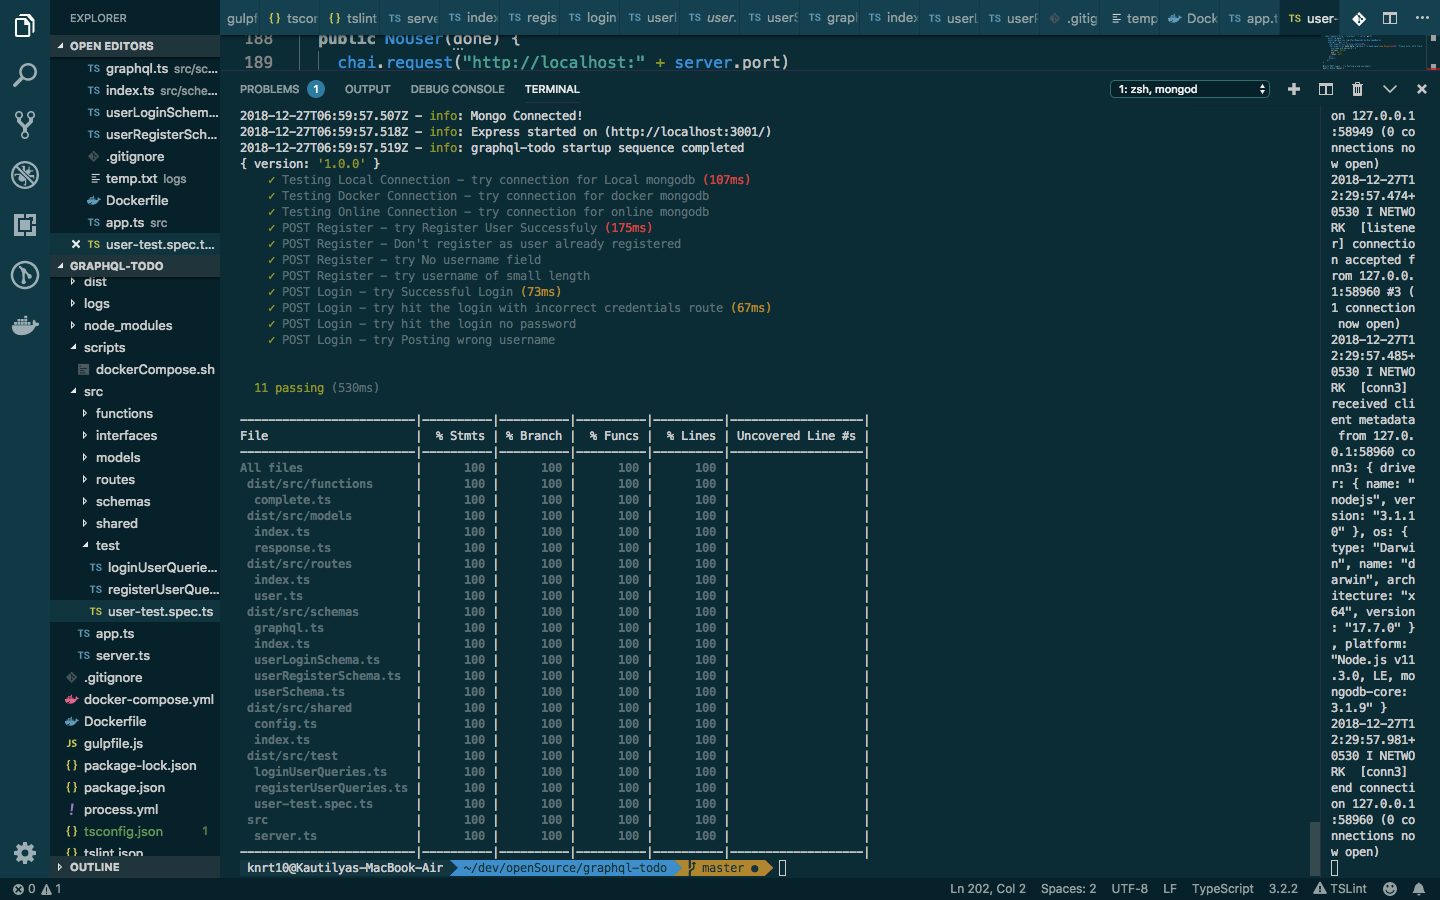
Project setup and tests until now with 💯 code coverage
Accessing the API
First check your mongoDB server is up and running. Then start your server by running the following command
npm start
To access the API of application open your GraphQL-Playground and enter url http://localhost:3000/graphql
Registering User to Database
Enter Query
mutation registerUser($input: UserInputRegister) {
  registerUser(input: $input) {
    code
    message
    data {
      token
      success
      user {
        id
        createdAt
        username
        name
        password
        updatedAt
      }
    }
  }
}
and then query variable
{
  "input": {
    "username": "knrt10",
    "name": "Kautilya",
    "password": "test"
  }
}
Then hit play button, you will get response like this
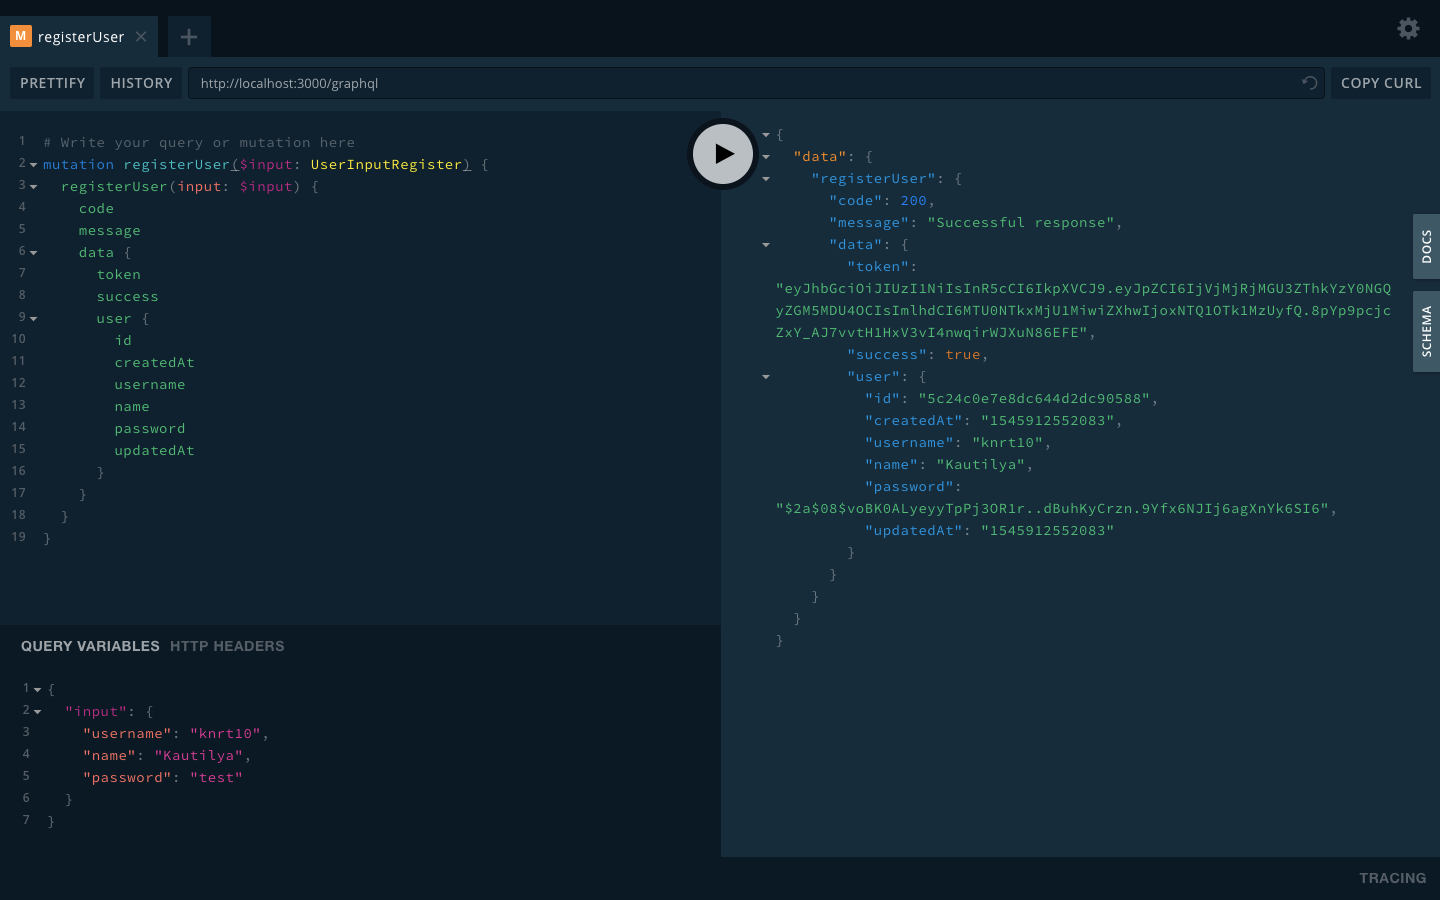
registering user to Database
Login API
Enter Query
query loginUser($input: UserInputLogin) {
  loginUser(input: $input) {
    code,
    message,
    data {
      success
      user {
        id
        name
        username
        password
      }
      token
    }
  }
}
and then query variable
{
  "input": {
    "username": "knrt10",
    "password": "test"
  }
}
Then after you hit play button you will see this output.
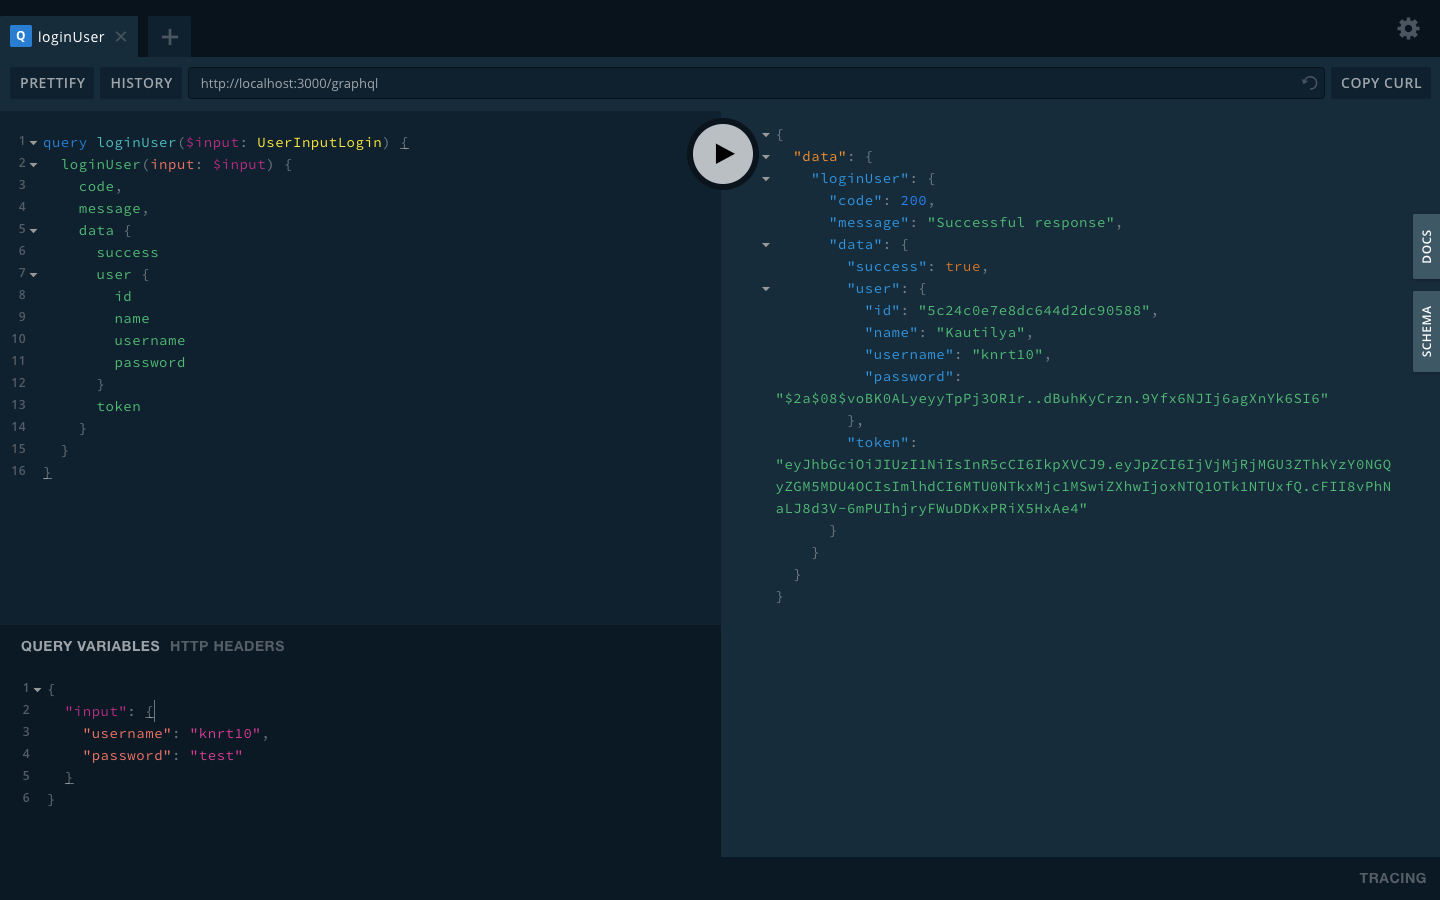
login response
Try playing with it and try to enter wrong data or anything like that. You might find we have covered error for most of the usual cases.
playing with GraphQL Playground 📹
Docker Users
You need to make all the code changes as above and then just run
npm run dockerStart
After that you can also excess API of application as above with same URL http://localhost:3000/graphql.
Then after using don’t forget to stop the container by runnnig npm run dockerStop.
Commiting our changes
Lets commit our new changes for this part. Copy and run the commands given below inside your git repository. Make sure you are in root folder.
git add .
git commit -m "Adding part2 changes"
Conclusion
That is for this part. In this part you learnt following things:-
Modularize code.
How to create Mongoose Schema.
Why GraphQL is better than REST.
How to setup GraphQL in node.
How to write Schema for GraphQL.
How and write tests and maintain 💯 code coverage 😉.
In next part you will create schemas for working with CRUD operation on a Todo, only when you are authenticated.
Support
I wrote this series of articles by using my free time. A little motivation and support helps me a lot. If you like this nifty hack you can support me by doing any (or all 😉 ) of the following:
Follow me on Github for more such projects.
⭐️ Star it on Github and make it trend so that other people can know about my project.
Did you find this page helpful? Consider sharing it 🙌
Kautilya Tripathi
Software Engineer 2
Certified Kubernetes Security Specialist (CKS) | Certified Kubernetes Administrator (CKA) | Distributed Systems | Systems Programming | OSS ❤️